How to enter, play, and learn from the current rehearsal build
Chalk & Chance is a playable teacher-rehearsal loop. The point is not to guess the right button. The point is to read the room, choose a teaching move, study the evidence, and replay with a sharper instructional focus.
The site has course access pages per class plus a public demo gate. CAT531 and CAT100 students should use their own course page; public visitors should use the demo gate.
CAT531 full access
Use cat531.html. It opens the live build with UA-CAT531-SUMMER26 preloaded so students enter only their name and the one shared course passcode.
CAT100 full access
Use cat100.html. Same setup as CAT531 with UA-CAT100-SUMMER26 preloaded, so CAT100 progress and logs stay separate by course.
Public taste demo
Use demo.html. It opens the safe demo with public_demo=1, deterministic responses, and voice off.
One shared passcode
The whole class uses the same course passcode. Enter it the first time to join, and again any time to continue your own saved progress. There is no separate per-student password to remember.
Optional student voice
The same course passcode also unlocks student voice through a short-lived server token, so the page never stores a passcode.
Current build map
What exists in the latest play structure
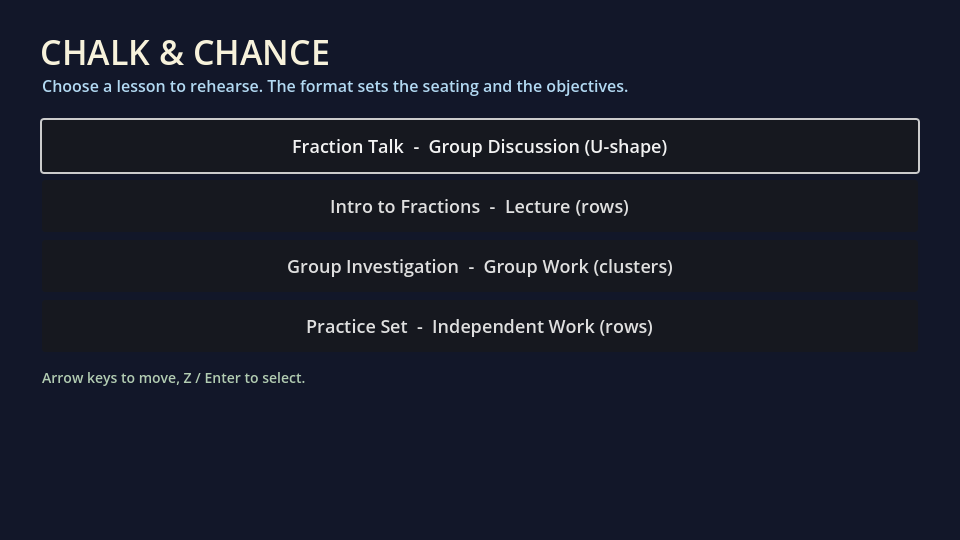
The current build is broader than a one-student dialogue demo. It has a hub, missions, multiple classroom modes, item loadouts, lesson import, and evidence surfaces.
Landing/Login
Choose demo or class sign-in. CAT531 links preload the class code and ask only for your name plus the one shared course passcode. CAT531 players begin from a clean baseline the first time they join.
Preview the story hook, success criteria, reward, evidence edge, and suggested first move.
Overworld classroom
Walk the room, face students, manage proximity, respond to prompts, and preserve attention/order/composure.
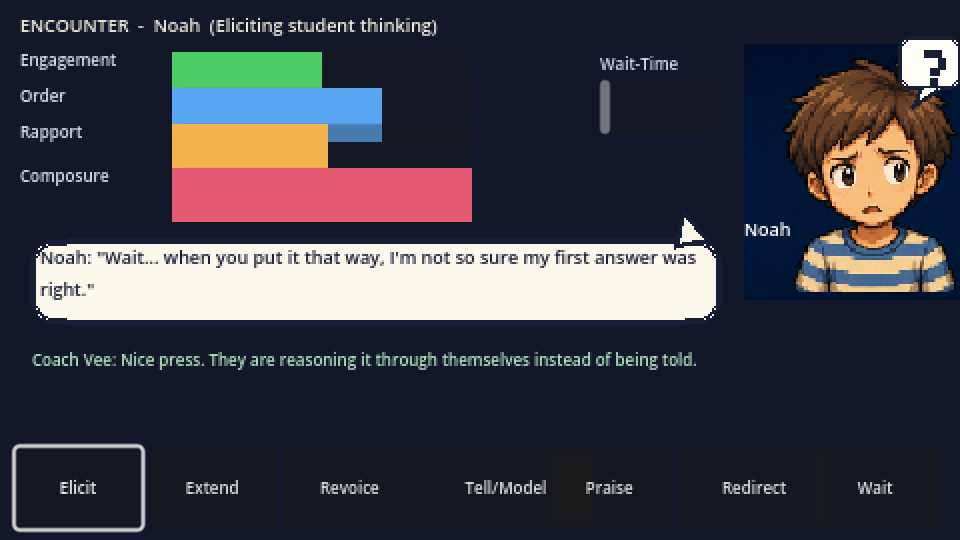
Encounter mode
Read one student's need, choose menu moves or type free-text teacher talk, and watch evidence-bearing feedback.
Lecture mode
Manage pacing, questioning, wait time, repair, and checks for understanding across multiple students.
Group check-in
Monitor group talk, distribute airtime, and surface shared reasoning instead of letting one student dominate.
Gym capstone
Resolve several students under pressure while protecting order, care, and reasoning at the same time.
Items and upgrades
Classroom tools support noticing, wait time, goals, composure, and equitable participation.
Lesson import
Paste a lesson plan and generate a scenario with objectives, roster, seating, and dialogue hooks.
Evidence Journal
Review competency estimates, uncertainty, evidence count, research anchors, and the next practice target.
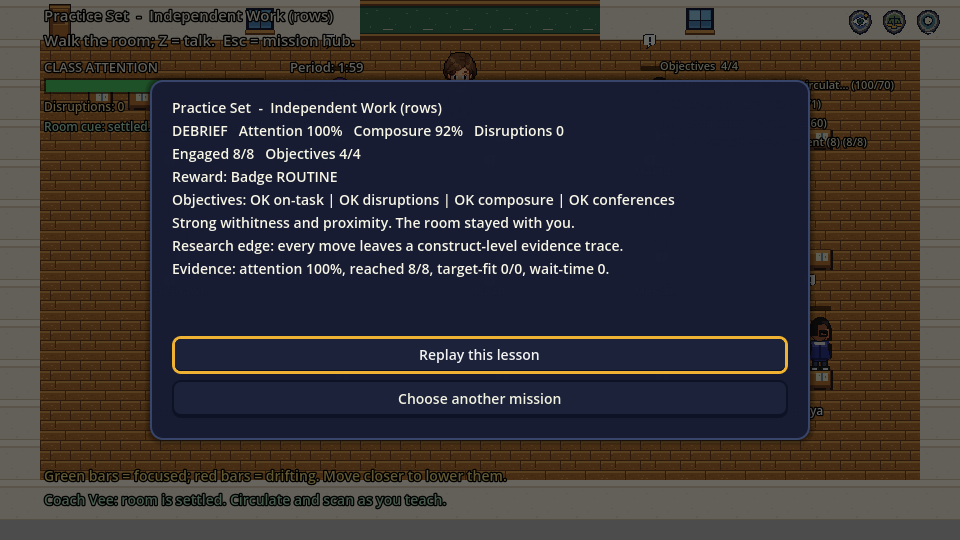
Debrief panels
Each mode ends with score drivers, objective status, rewards, evidence fingerprint, and replay guidance.
Screen recording
Watch the player guide with subtitles
The video walks through the same steps as this guidebook. Use it first if you want the fastest orientation, then use the written guide as a reference while playing.
13-step walkthrough
What to see, study, and notice in the current build
Each step separates screen reading from learning interpretation. Use the three columns as a habit: first observe, then study, then reflect.
Step 1
Choose the right access path
What you see
CAT531 full access, public demo, and optional voice-passcode paths.
What you study
Course access and public demo are intentionally different. Course play uses the live build and class account flow; the public demo protects paid AI/voice use.
What to notice
For CAT531, start at the course page so the class code is already loaded.
Step 2
Read the login screen
What you see
For CAT531, the screen asks for your name and the one shared course passcode only.
What you study
CAT531 links preload UA-CAT531-SUMMER26. Everyone in the class uses the same course passcode: enter it once with your name to join, and re-enter it any time to continue your own saved progress.
What to notice
Sign-in saves your class progress, telemetry, competency evidence, and instructor-facing analytics. First-time CAT531 sign-in starts from a clean baseline.
Badges are practice goals: Routine is pacing, Echo is reasoning, Balance is airtime, Mirror is feedback, and Insight is capstone judgment.
What to notice
Locked missions are not a punishment. They show the sequence of teaching skills the game wants you to build.
Step 4
Open mission briefing before play
What you see
Scenario art, story hook, success conditions, reward, evidence edge, and first-move guidance.
What you study
The briefing tells you what kind of teaching practice the mission is designed to elicit.
What to notice
Do not skip the evidence edge. It tells you what the system will treat as meaningful evidence.
Step 5
Set up comfort and tools
What you see
Settings, item loadout, upgrades, and Import a lesson plan.
What you study
Settings adjusts sound, voice, larger text, reduced motion, and dialogue speed. Items support noticing, wait time, goals, composure, and equity.
What to notice
The game can become closer to your teaching context through imported lesson plans and deliberate tool choices.
Step 6
Read the classroom signals
What you see
Students, bars, objective checklist, attention, composure, order, participation, wait time, and possible disruptions.
What you study
These are live teaching signals. Attention shows whether the room is with you. Composure shows your remaining capacity. Participation shows inclusion.
What to notice
You are managing a learning environment, not only choosing dialogue.
Step 7
Enter a student thinking moment
What you see
A student nearby and an interaction hint.
What you study
Move with arrow keys or WASD. Press Z, Enter, or Space when facing a student.
What to notice
Interaction is a teaching decision. You are deciding when to step into a student's thinking, not collecting points.
Step 8
Read the student or group first
What you see
A student response, group turn, class reaction, portrait, meters, and possible teaching moves.
What you study
The hidden need behind the response: confusion, dominance, avoidance, anxiety, off-task behavior, or readiness for a deeper prompt.
What to notice
Listen before acting. The best move depends on what the learner or group needs, not just which button sounds positive.
Step 9
Use academic teaching moves
What you see
Elicit, Extend, Revoice, and Wait.
What you study
Elicit asks for reasoning. Extend presses deeper. Revoice clarifies or restates the student's idea. Wait protects thinking time.
What to notice
These moves help students do the thinking themselves.
Step 10
Use social and management moves carefully
What you see
Connect, Praise, Redirect, and Tell.
What you study
Connect draws on a student asset. Praise names useful effort. Redirect protects classroom order. Tell gives the answer directly but may reduce practice.
What to notice
Faster is not always better. The strongest move preserves student thinking while supporting the room.
Step 11
Read the result chip and evidence
What you see
Feedback after your move, including changes to understanding, engagement, rapport, order, attention, or participation.
What you study
Cause and effect. Your choice changes the classroom state, and the result chip tells you what moved.
What to notice
The classroom is responding to your teaching decision. Use that response to adjust, not to judge yourself.
Step 12
Use the debrief and Evidence Journal
What you see
A reflection prompt first, then a compact debrief with objectives, rewards, score drivers, evidence fingerprint, and next focus.
What you study
The missed objective or strongest evidence line. In the Evidence Journal, read probability, uncertainty, evidence count, research anchor, and next target.
What to notice
The debrief turns gameplay into reflection-on-action rather than a hidden score screen.
Step 13
Replay with one focus
What you see
The option to replay or choose another mission.
What you study
One specific focus for the next run, such as wait time, eliciting reasoning, or distributing attention.
What to notice
Improvement comes from focused repetition. Try again with a clearer teaching intention.
Button glossary
What each teaching move is for
Use this as a quick reference while playing. These terms show up in encounter, lecture, group, and capstone variants, sometimes as menu buttons and sometimes through free-text classification.
Elicit
Ask the student to explain their reasoning before you correct or evaluate it.
Extend
Press for a deeper connection, example, justification, or next step.
Revoice
Restate a student's idea so the room can hear it and the student can refine it.
Wait
Pause long enough for thinking to happen. The pause is part of the teaching move.
Connect
Use a student asset, interest, or context to bridge into the academic idea.
Praise
Name a specific useful effort or strategy, not just the person.
Redirect
Handle off-task behavior with the smallest effective intervention.
Tell
Give the answer directly. It may be efficient, but it can reduce student thinking practice.
Free text
Type your own teacher talk. The game maps it back to evidence-bearing moves such as elicit, extend, revoice, praise, redirect, connect, wait, or tell.
Items
Use classroom tools when a mission calls for extra noticing, composure, equity, wait-time support, or a clearer practice goal.
How to interpret the activity
The game loop as learning loop
Observe: Read the room and the student's response.
Choose: Select a move, type teacher talk, or use an item that fits the need.
Read feedback: Look at what changed in understanding, engagement, rapport, order, participation, attention, and composure.
Reflect: Use the reflection prompt, debrief, and Evidence Journal to name one next practice focus.
Use the Hub as a learning map.Read student need before choosing a move.Read evidence as a practice signal.
FAQ
Common beginner questions
Do I need a class code?
No for public exploration: use the demo gate or guest play first. Yes for assigned course progress: CAT531 students use the CAT531 page and CAT100 students use the CAT100 page, so the right class code is preloaded.
What is different about the CAT531 page?
It opens the full live build with UA-CAT531-SUMMER26 already loaded. The whole class shares one course passcode: enter it with your name to join, and re-enter it any time to continue your own saved progress, so there is no separate per-student password to remember. First-time CAT531 sign-in starts from a clean baseline. The same passcode also unlocks optional student voice through a server-issued token.
What about the CAT100 page?
It works exactly the same way as the CAT531 page, with UA-CAT100-SUMMER26 preloaded instead, so each course keeps its own accounts, progress, and logs.
Where do I get the passcode?
Your instructor shares the course passcode with the class. It is not printed on this public guide. The same code is used for joining, continuing, and unlocking optional voice.
Why is voice sometimes off?
The public demo disables voice to prevent paid API and ElevenLabs overuse. Voice-enabled sessions use the shared course passcode gate, which returns a short-lived token.
Am I supposed to win every encounter?
No. The game is designed for rehearsal. A miss is useful when it tells you which teaching signal you ignored or misunderstood.
How do I know which button to choose?
Start by reading the student need. If the student is confused, elicit or revoice. If the student needs time, wait. If the room is drifting, redirect. If the student needs connection, connect.
What should I study after a run?
Study the missed objective first, then check the Evidence Journal and pick one next focus. Do not try to fix everything in one replay.
I am the instructor. Where do I see class progress?
Use the instructor dashboard with your instructor sign-in. It shows class activity, skill mastery with at-risk flags, per-learner progress, and suggested interventions. Student accounts cannot open it.
Downloads and source files
Guidebook assets
These files are public-facing guide assets for the official site.